


Closed Loop Horticulture (Closed Environment Agriculture)
Closed Loop Horticulture (Closed Environment Agriculture)
Product Compare (0)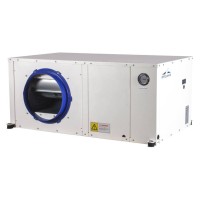
-200x200.jpg)
Merging Nature and Technology Even Closer Together
Closed Loop Horticulture
This method is also known as: Closed Growing Environment (CGE), Sealed Room, Closed Loop Environment or the Perfect Room.
Esoteric Horticulture LTD have been assisting and advising our customers in the purchasing and setting up of equipment for closed loop, sealed environment rooms for well over 7 years now; we have been learning a lot about the subject in the process, and we are still learning every day. So, we thought it was time to create an up-to-date guide in setting up a perfect room, armed with all we have learned.
So what is a sealed room? First and foremost, it is the only way to really have true control of an indoor growing environment all year round. It’s an indoor garden which is completely air sealed from the outdoor environment; this means no air exchange and the replacement of extraction systems with air conditioning, dehumidification, humidification and CO2 augmentation. Unlike a traditional indoor garden which relies on air exchange through extraction and intake fans to remove heat and humidity whilst bringing in fresh air containing atmospheric levels of CO2, a sealed garden relies on air conditioners, humidity control and CO2 dosing equipment to do the same job. The difference is when you spend the money to go sealed and do it properly, your garden will be under your complete control 365 days a year and running at optimal conditions every single day. This cannot be achieved through traditional extraction style grow room set-ups, because they rely on outdoor air, which we do not have control over; extreme heat during the summer and cold spells through the winter will always dictate the conditions in the grow room. When going sealed, we dictate the environmental conditions in our grow space precisely and eliminate many of the problems and issues caused by the fundamental flaw in traditional extraction gardens.
The key benefits are:
- No overheating issues caused by warm outdoor air
- Very restricted pest problems caused by outdoor contamination through intake air
- Superior control of environmental parameters (CO2, temps, RH)
- No wasted or lost CO2 through extraction
- No air leaks or unwanted contaminants escaping the grow room
- Up to 50% increased yield compared to traditional rooms
- Faster growth rates
- Cleaner more manageable workspace
- Generally more efficient in every way
Planning
When setting up a closed room, or any room, it is important to plan everything thoroughly, but this is especially true in a sealed room. As most people taking on this challenge are doing medium to large set-ups and it is not a cheap task, we all want to get it done the right way from the start. It’s very worthwhile the extra time and cost when done correctly and with our help, the benefits will far outweigh the initial outlay costs, and you will never ever look back nor regret taking the step!
The first thing to consider is your power supply. Make sure you have enough amperage available; it’s highly recommended to get a qualified electrician to wire up a dedicated consumer unit running from a heavy duty armoured cable directly to your room. Have it RCD protected - this might well save your life, and ideally, have dedicated breakers for multiple power circuits throughout the room. So for instance a dedicated breaker of appropriate type and amperage for your air conditioner(s), then another dedicated breaker for every four kilowatts worth of light, and another for your dehumidifiers etc. Doing this will save you a lot of problems should any equipment become faulty during operation, for example if a faulty ballast trips a breaker, you will only lose power to a bank of lights, rather than the entire grow room, and you have the problem isolated to that bank of lights. If the whole room ran off one big breaker and a ballast became faulty and tripped the power, you would have no idea which ballast was the culprit, or even if it was a ballast causing the power cut. You could spend days in there trying to figure out where the issue was, during which time your room has been tripping power on and off ruining the light cycle and potentially ruining the whole crop, or delaying the whole operation at best.
The next thing to consider is insulation and efficiently sealing the room, what materials to use in the build and planning it all to give you enough space. It is highly recommended to build rooms with as little exposed wood as possible. Wood is not clean; it can become a breeding ground for bacteria, spores and moulds. Use metal framing for lighting systems and other equipment to be mounted on wherever possible, use insulation board on the floor, walls and ceiling of the room, fill all gaps with silicon or expanding foam, then use black and white sheeting or Mylar to line out the entire room. In order that it is perfectly clean, insulated and air sealed, consider waterproofing the floor and having drainage in case of spillages. Remember drains require an air gap so as not to allow bacteria to find its way up into condensation lines from air conditioners or hydroponic system drainage pipes etc. Plan the room out as thoroughly as possible, have built-in contingency for potential problems that may occur. Also think about your water supply. Do you have good mains pressure? Is it worth sending us a sample of your water to make sure it’s ideal for growing plants? If you have extremely hard water is it worth setting up a filtration system for the water? And of course, consider how you would like to set up your plants. Which method is going to work best for you; recirculating hydroponics, run to waste hydroponics, run to waste coco, soil etc. Recirculating has a few key benefits, as does run to waste. Some people want to stay organic with soil. This really is up to the grower and a closed room will work well with any method, however we recommend hydroponics for several key reasons. It’s cleaner and sealed rooms should be treated and built much like a cleanroom or laboratory. Cleanliness should be absolutely top on the priority list. Hydroponic methods produce faster growth and larger yields, the roots receive superior aeration, resulting in a better metabolism. Generally with hydroponics, especially if tailored and customised for the given situation results in a lot less waste. Bringing massive amounts of soil in and out between crops is not ideal for most people. The list goes on and on! But hydroponics is what we recommend, the options are endless in terms of systems and methods and it does depend on each customer’s situation, but we are here to help you all choose which path to take.
Once you have considered all of these fundamental factors and have a viable plan in place, it is time to get to the really fun part - planning the setting up of the room itself. The first thing after all of the previous considerations is lighting. Lighting and environment are the number one requirements of high energy plants, and the lights are the key power consuming and heat generating items in a grow room, so the first thing to decide upon is your light, which I will go into later in more depth. You then plan the rest of the room and environmental controls around how many lights you have and more importantly how much heat they and the other peripheral equipment will generate. We are planning a sealed room here; this means every single item in the room which uses power is generating heat, so we must accurately calculate our heat load in order to correctly size our cooling system. And there is a particular order in which this should be done. Every single watt of power drawn from the wall creates 3.41 BTUs (British thermal units) of heat, your lights being the most significant, followed by dehumidifiers, then depending on how you’re setting up your plants, you may have powerful chillers and air pumps to consider. So we add up all of the wattage to figure out the total heat load and very importantly, during this process we can figure out dehumidification requirements too.
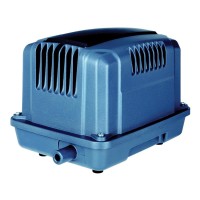
For example, let’s say you decide on 4 x 315 CDM full fixtures and 6 x 600w HPS full fixtures for your lighting in one room. This is approximately 4860 watts of light. We have found over a lot of time doing this that the dehumidification requirements in sealed rooms are significant, approximately 20 litres of moisture removal per 24 hours per 1000 watts of light so this is the next thing to factor in. For the above scenario we need 100 litres of dehumidification, so let’s say we chose a machine which consumes 950 watts, we add this to our total. Now let’s say in this particular room we chose a recirculating hydroponic system with a reservoir volume of 500 litres which requires a 500 litre capacity water chiller, and this chiller draws 550 watts of power, we add this in. Then we have some air pumps which draw 180 watts collectively, we now have our total power consumption and heat load which we can add together to give us our total cooling requirements which in this case is 6540 watts x 3.41 Btus giving us a total cooling requirement of 22301 BTUs. We then should always add 15% extra to account for room volume, how efficiently insulated we are, outdoor temperature variations, the gardener being in the room for prolonged periods of time - all these things will affect the heat load and therefore, the cooling requirements, plus factoring in some extra capacity will allow the air conditioner some breathing room. Having it completely flat out all the time is a lot to ask of any machinery however well-built or high quality it may be. Now with the extra 15% we have a total of 25646 BTUs of cooling required for this particular room. Once this is calculated, we can really get into it and decide the specific lighting and other equipment we want to use, figure out the dynamics of the room and how we want it to run, and above all, design with efficiency in mind. This is what we should aim for in all aspects of the garden, we want uniformity, cleanliness and efficiency. So what I am going to do is break it all down in stages and in order, whilst accounting for all the variables, the things the gardener needs to know about and learn, preventing problems before they begin, think about the main things to aim for when setting up the room, target temperatures and humidity, CO2 dosing, the airflow dynamics, eliminating potential hot spots and micro climates, sterility in the air, keeping it clean, the layout of the plants, leaving enough space to access everything. Factor in every feature you need in your room and everything you need to be able to control, then plan it accordingly to accommodate.
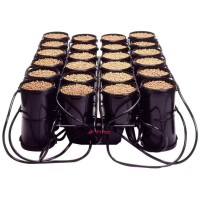
Hydroponics System
Personally we believe in the philosophy of less is more. We like to give plants plenty of space to grow and we also believe it to be very important to be able to access every single plant for maintenance, to be able to remove branches where necessary, defoliate, top, manipulate and train each plant as required, and we also believe in efficiency. The two best methods we have found are RDWC (recirculating deep water culture) and flood and drain. When planning a large room and the budget is available RDWC is the best choice - it’s clean and water intensive, which means virtually no grow media, which means less waste and far easier harvesting and replanting without needing to get rid of excessive quantities of used media like pebbles, soil or coco and you give your plants massive access to oxygen and nutrient. It’s simple and very efficient. We recommend regular tank changes and to use RO (reverse osmosis water) where possible. The only real down side is that with large RDWC systems, you generally have lower plant numbers which can require a longer vegetative growth time, but you will get very large and heavy yielding plants, and less of them to worry about and pay attention to. It’s also a sure way to keep water temperatures optimal and water conditions free of disease when run with water chillers and sterilising water treatments. The next best option if on a slightly tighter budget with less readily available power to run chillers and/or less water supply available is flood and drain. It usually requires more media to work with but it will be easier to run more plant numbers spaced closer together, resulting in less vegetative growth time and ultimately a potentially higher number of harvests per year. One other method with many benefits worth considering, especially if you’re looking at a very large project or commercial scale application is run to waste in rockwool. It’s clean, it’s very difficult for root disease to spread, your nutrition and pH levels stay precise and unaffected, the waste can be kept minimal, both with the water usage and media disposal, and on a large scale you have less things to think and worry about. There is a reason the majority of commercial facilities worldwide employ this growing method - it’s efficient.
Lighting
Don’t cheap out on lighting people, it’s the most important thing to your plants, the most energy consuming and heat generating items in your room and ultimately can mean the difference between a huge top shelf yield and a pitiful garbage yield not worth even bothering with, so choose wisely! In our personal opinion and experience, the best lights for plants currently available are CDM (ceramic discharge metal-halide) otherwise known as LEC or CMH. They come in several wattages, currently the most popular and efficient being 315 watts. They produce full spectrum light, the closest thing to the sun as possible on the market, the lamps last for about four years before they need replacing, the amount of light they generate which is usable to plants per watt of power used when compared to other conventional lamps is far more efficient. We have found that most people who replace a 1000 watts of HPS light with 945 watts of CDM light manage to easily see a 25% increase in yield per watt of power, a slightly faster flowering period, superior end produce and the plants just look so much happier under these lamps. However, there is a theory, and it is not my theory, nor proven, but it does make a lot of sense to me: indoor plants have been bred indoors for generations under HPS light, could they have genetically adapted to this far red spectrum and become so used to it that even though on paper it’s mostly wasted light and not ideal for plant growth, that they still want some of it and crave it, because it’s what they have been used to for generations. So in my opinion having some supplemental HPS dotted around the room, maybe 15% of your total lighting, is very good practice. But use predominantly CDM fixtures; currently these are the absolute most efficient and reliable lighting to use. Also professional high wattage LEDs now in my opinion do put down enough radiant heat to the plants. Plants don’t want to be cold, and a sealed room full of cool air and lots of light in our experience has not produced even close to the results that CDM can produce. We also recommend saturating with as much light as you can manage and afford; the plants will only thank you for it and ultimately yield more. Another very important consideration if you are setting up a sealed room is to use lighting systems with thermostatic shut off capabilities, in case of cooling system failure, this will save your room, your plants and your equipment from cooking to catastrophically hot temperatures in the event of cooling failure!
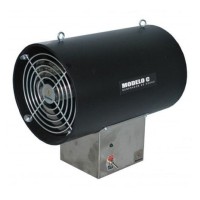
Air Conditioning and Dehumidification
So we know how to size our AC and dehumidification according to our cooling requirements, so what else should we consider when choosing our equipment? Firstly I must stress that in any set-up larger than 4000 watts of light, conventional comfort cooling and DIY install air conditioners should be avoided; they simply do not have the power and build quality to handle the massive heat load we are asking of them, and they are usually very inefficient, especially the portable and hosed types. Your AC is a very important aspect of a sealed garden; we recommend ceiling hung commercial split systems, water cooled systems and the absolute best, but extremely expensive option, is a split chilled water cooling system. All of the mentioned options have their benefits and drawbacks. Split systems exchange no air in or out of the sealed space, they work by passing the indoor room air over a coil full of very cold refrigerant, which rapidly removes heat and moisture from the air and transfers the heat into the refrigerant, which then transfers the heat to the outdoor condenser unit where the heat is expelled outside and the refrigerant cools down and heads back to the indoor unit and the process repeats itself continuously over and over. They are energy efficient, they generally have high air flow capacity which allows them to keep the air moving and flowing around the room quick enough to keep the environment even and optimal. The main drawbacks of these systems are the need to have an outdoor unit which is not always ideal for some situations. They only dehumidify while they are cooling and installing them can be challenging; you really need a qualified AC engineer to do the job properly and have a long term reliable cooling system. DIY installation is still possible, but you have one chance to get it right. If you get a refrigerant leak, you will have problems. There are also limitations in how far you can run the refrigerant pipes between the indoor and outdoor units. Water-cooled systems are the next choice, very good if you have access to a lot of cheap or free water. They work in a similar fashion to a split system except rather than transferring the heat from the refrigerant to an outdoor unit, they transfer it to mains water which runs down the drain. They also benefit from the ability to mass dehumidify while they are not cooling, so you will need less budget towards dehumidification as they will do a large portion of that job for no extra cost and less power consumption. The only real drawback with these units are the water they consume - it is considerable. A 10 kilowatt room will use 5 litres of water per minute straight down the drain, so if you pay for water by the unit, it’s not likely to be a viable option. Then we have the best of both worlds - a split chilled water system. These systems are usually used for process cooling, meaning applications like server rooms in airports and telephone exchanges or government buildings, basically places where cooling equipment cannot fail! They are designed for continuous heat load and designed to look after priceless and important, highly valuable heat generating equipment, so they are 100% reliable, quality built machines. They work similarly to a split AC except they use water and glycol antifreeze stored in an internal or external reservoir which is pumped between the indoor air handlers and outdoor water chillers. There are no limitations in the length of runs between the indoors and outdoors, they are up to 50% more energy efficient than split air conditioners, there is no need for an engineer to install them, they can be adjusted to dehumidify more or less aggressively, and they can dehumidify whether they are in cooling mode or not. The only drawback with these machines are the price tag - they are extremely expensive, but if it’s a long term project and reliability, efficiency and performance are at the top of the list, they are by miles the best choice.
Dehumidification is the next thing to consider. Plants transpire 97% of everything they drink. If your plants are drinking a 200 litre tank down to half way every 2 days, literally all of that water is being transpired from the plants back into the room, and if your sealed and have no dehumidification, where’s all that water going to go? Nowhere is the answer! It’s staying in your room causing uncontrollable 100% relative humidity and condensation all over everything! So sizing your dehumidification is just as important as your cooling system. We have tried coming up with formulas and ways of calculating dehumidification requirements in the past and it is almost impossible to get it accurate because at different stages of growth, plants drink more and it depends on how large they are, how much biomass they have, target temperature, literally everything affects the transpiration and room relative humidity. So I am going to just advise what we have found to be more than enough dehumidification for huge plants in heavy flower with masses of foliage - 20 litres per 1000 watts of light does the trick! When choosing dehumidification, consider my advice on the AC. We are putting these dehumidifiers up against it, continuous load, and tons of water moisture to take care of, so don’t expect a domestic unit to make a pin prick in the room; you need commercial grade powerful dehumidification capable of keeping up with what we are throwing at it.
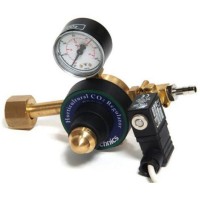
CO2 Augmentation
One of the most important things to your plants is CO2, and in a sealed off grow environment it’s very important to get your CO2 set up correctly. Plants can grow well in atmospheric levels of CO2, which is approximately 400ppm, but they can grow much faster and bigger in a carefully dosed level of CO2. Some claim that 1500 – 1800 ppm of CO2 is optimal. This is not the case. In actual fact, most high energy plants begin to suffer in levels exceeding 1450 ppm; it turns out that when you exceed 1450 ppm the stomata in most species of high energy plants begin to close up and therefore suffer and don’t metabolise as efficiently. The ideal range to maintain is 1250 to 1350ppm of CO2 while the lights are on and then drop it back to atmospheric levels when the lights are off. The two options for CO2 dosing to consider are bottled CO2 with a regulator connected to a CO2 controller which doses precisely the required levels of CO2 when the lights are on and then shuts it off when the lights are off. The other option is a CO2 generator, which burns LPG or NG gas in order to generate CO2. Our number one choice would always be the bottle; it’s cleaner, it creates no additional heat or humidity like a generator does, and generators will give off some carcinogenic gases, minor maybe, but less ideal than clean bottles of CO2. The CO2 controller is very important and should be set up correctly. We don’t want CO2 build-ups at night, so we recommend a controller which can have a pre shut off cycle, meaning it will stop dosing CO2 15 or 20 minutes prior to the light shutting off, which will result in the plants consuming all of the CO2 available in the room and the levels will be dropped right down before the night cycle starts, because while plants are not photosynthesising they give off CO2. This build-up of CO2 in the room whilst the lights are off is not ideal and should be avoided.
Humidification
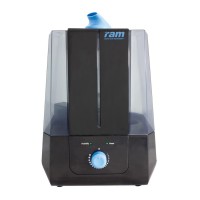
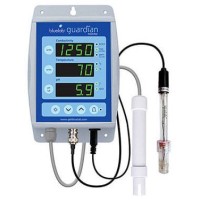
A very important consideration, especially when the plants are young and are not transpiring very much moisture into the room. If you have a lot of light running and your AC is working hard, it will strip the moisture from the room rapidly and this will result in very low relative humidity and a less efficient cooling capacity. The AC needs moisture to bite into in order to run efficiently, as do your plants, so humidification is very important too. We recommend about 1 – 2 litres of humidification per hour per 1000 watts of light, and we recommend commercial grade humidification, positioned away from direct plant contact. Ideally it needs to mix into the air rather than just soaking the plants immediately next to it. Humidifiers will also come in very handy if your trying to stick to the VPD chart, which essentially means keeping higher temperatures and relative humidity levels to accompany the extra co2 which allows your plants to metabolise and grow at far faster rates than they usually can, VPD or vapour pressure deficit is the relationship between moisture in the air and moisture exiting the stomata of the leaves through transpiration, it’s a fundamental hidden force on your plants and the secret key to taking full advantage of co2 and environmental control in a sealed grow room, if your unfamiliar with VPD I suggest you look it up! VPD control is now possible with the GHC Smart VPD Digital Temp / Humidity Controller. Ultimately if there is no moisture in the air, your cooling efficiency suffers and much worse, your plants will over transpire and suffer very quickly in low humidity conditions, and at the end of the day, the point of a perfect room is for it to be as close to perfect as possible, so everything must be taken care of - humidification, cooling, dehumidification, CO2 etc. are all as important as each other. If one falls out of sync the rest will fall apart as well. Humidification controllers are very important too; we highly recommend setting your humidification and dehumidification in a day/night controlled fashion, meaning we can dial in different levels in the day to the night. I’ll talk more about this later.
Air flow and Care
We have covered room build briefly! Lighting, cooling, humidity control and CO2 and the recommended equipment required to achieve optimal reliable environmental parameters. Now we will touch upon all the other peripherals which are essential to the room’s dynamics. Air flow and care are extremely important to keep the temperatures, humidity and CO2 levels even and optimal throughout the room. It’s very important to keep the air moving and flowing. Equipment needs to be strategically placed; we want to avoid any build-ups of CO2 in corners of the room due to loss of air movement, likewise, we also want air flowing freely from AC and dehumidifiers to ensure the environment is even everywhere in the grow space. You should be able to feel a gentle breeze wherever you stand in the room, and we want air being dragged from the floor upwards and air across the ceiling moving quickly too, so all of the heat and humidity is always mixing through and being cooled and controlled everywhere. We recommend going overboard with wall fans and floor fans, and don’t use cheap ones if you can avoid it, as mentioned earlier. Make sure air handlers for cooling systems are heavy duty ones with big airflow capacity which will churn t
Merging Nature and Technology Even Closer Together
Closed Loop Horticulture
This method is also known as: Closed Growing Environment (CGE), Sealed Room, Closed Loop Environment or the Perfect Room.
Esoteric Horticulture LTD have been assisting and advising our customers in the purchasing and setting up of equipment for closed loop, sealed environment rooms for well over 7 years now; we have been learning a lot about the subject in the process, and we are still learning every day. So, we thought it was time to create an up-to-date guide in setting up a perfect room, armed with all we have learned.
So what is a sealed room? First and foremost, it is the only way to really have true control of an indoor growing environment all year round. It’s an indoor garden which is completely air sealed from the outdoor environment; this means no air exchange and the replacement of extraction systems with air conditioning, dehumidification, humidification and CO2 augmentation. Unlike a traditional indoor garden which relies on air exchange through extraction and intake fans to remove heat and humidity whilst bringing in fresh air containing atmospheric levels of CO2, a sealed garden relies on air conditioners, humidity control and CO2 dosing equipment to do the same job. The difference is when you spend the money to go sealed and do it properly, your garden will be under your complete control 365 days a year and running at optimal conditions every single day. This cannot be achieved through traditional extraction style grow room set-ups, because they rely on outdoor air, which we do not have control over; extreme heat during the summer and cold spells through the winter will always dictate the conditions in the grow room. When going sealed, we dictate the environmental conditions in our grow space precisely and eliminate many of the problems and issues caused by the fundamental flaw in traditional extraction gardens.
The key benefits are:
- No overheating issues caused by warm outdoor air
- Very restricted pest problems caused by outdoor contamination through intake air
- Superior control of environmental parameters (CO2, temps, RH)
- No wasted or lost CO2 through extraction
- No air leaks or unwanted contaminants escaping the grow room
- Up to 50% increased yield compared to traditional rooms
- Faster growth rates
- Cleaner more manageable workspace
- Generally more efficient in every way
Planning
When setting up a closed room, or any room, it is important to plan everything thoroughly, but this is especially true in a sealed room. As most people taking on this challenge are doing medium to large set-ups and it is not a cheap task, we all want to get it done the right way from the start. It’s very worthwhile the extra time and cost when done correctly and with our help, the benefits will far outweigh the initial outlay costs, and you will never ever look back nor regret taking the step!
The first thing to consider is your power supply. Make sure you have enough amperage available; it’s highly recommended to get a qualified electrician to wire up a dedicated consumer unit running from a heavy duty armoured cable directly to your room. Have it RCD protected - this might well save your life, and ideally, have dedicated breakers for multiple power circuits throughout the room. So for instance a dedicated breaker of appropriate type and amperage for your air conditioner(s), then another dedicated breaker for every four kilowatts worth of light, and another for your dehumidifiers etc. Doing this will save you a lot of problems should any equipment become faulty during operation, for example if a faulty ballast trips a breaker, you will only lose power to a bank of lights, rather than the entire grow room, and you have the problem isolated to that bank of lights. If the whole room ran off one big breaker and a ballast became faulty and tripped the power, you would have no idea which ballast was the culprit, or even if it was a ballast causing the power cut. You could spend days in there trying to figure out where the issue was, during which time your room has been tripping power on and off ruining the light cycle and potentially ruining the whole crop, or delaying the whole operation at best.
The next thing to consider is insulation and efficiently sealing the room, what materials to use in the build and planning it all to give you enough space. It is highly recommended to build rooms with as little exposed wood as possible. Wood is not clean; it can become a breeding ground for bacteria, spores and moulds. Use metal framing for lighting systems and other equipment to be mounted on wherever possible, use insulation board on the floor, walls and ceiling of the room, fill all gaps with silicon or expanding foam, then use black and white sheeting or Mylar to line out the entire room. In order that it is perfectly clean, insulated and air sealed, consider waterproofing the floor and having drainage in case of spillages. Remember drains require an air gap so as not to allow bacteria to find its way up into condensation lines from air conditioners or hydroponic system drainage pipes etc. Plan the room out as thoroughly as possible, have built-in contingency for potential problems that may occur. Also think about your water supply. Do you have good mains pressure? Is it worth sending us a sample of your water to make sure it’s ideal for growing plants? If you have extremely hard water is it worth setting up a filtration system for the water? And of course, consider how you would like to set up your plants. Which method is going to work best for you; recirculating hydroponics, run to waste hydroponics, run to waste coco, soil etc. Recirculating has a few key benefits, as does run to waste. Some people want to stay organic with soil. This really is up to the grower and a closed room will work well with any method, however we recommend hydroponics for several key reasons. It’s cleaner and sealed rooms should be treated and built much like a cleanroom or laboratory. Cleanliness should be absolutely top on the priority list. Hydroponic methods produce faster growth and larger yields, the roots receive superior aeration, resulting in a better metabolism. Generally with hydroponics, especially if tailored and customised for the given situation results in a lot less waste. Bringing massive amounts of soil in and out between crops is not ideal for most people. The list goes on and on! But hydroponics is what we recommend, the options are endless in terms of systems and methods and it does depend on each customer’s situation, but we are here to help you all choose which path to take.
Once you have considered all of these fundamental factors and have a viable plan in place, it is time to get to the really fun part - planning the setting up of the room itself. The first thing after all of the previous considerations is lighting. Lighting and environment are the number one requirements of high energy plants, and the lights are the key power consuming and heat generating items in a grow room, so the first thing to decide upon is your light, which I will go into later in more depth. You then plan the rest of the room and environmental controls around how many lights you have and more importantly how much heat they and the other peripheral equipment will generate. We are planning a sealed room here; this means every single item in the room which uses power is generating heat, so we must accurately calculate our heat load in order to correctly size our cooling system. And there is a particular order in which this should be done. Every single watt of power drawn from the wall creates 3.41 BTUs (British thermal units) of heat, your lights being the most significant, followed by dehumidifiers, then depending on how you’re setting up your plants, you may have powerful chillers and air pumps to consider. So we add up all of the wattage to figure out the total heat load and very importantly, during this process we can figure out dehumidification requirements too.
For example, let’s say you decide on 4 x 315 CDM full fixtures and 6 x 600w HPS full fixtures for your lighting in one room. This is approximately 4860 watts of light. We have found over a lot of time doing this that the dehumidification requirements in sealed rooms are significant, approximately 20 litres of moisture removal per 24 hours per 1000 watts of light so this is the next thing to factor in. For the above scenario we need 100 litres of dehumidification, so let’s say we chose a machine which consumes 950 watts, we add this to our total. Now let’s say in this particular room we chose a recirculating hydroponic system with a reservoir volume of 500 litres which requires a 500 litre capacity water chiller, and this chiller draws 550 watts of power, we add this in. Then we have some air pumps which draw 180 watts collectively, we now have our total power consumption and heat load which we can add together to give us our total cooling requirements which in this case is 6540 watts x 3.41 Btus giving us a total cooling requirement of 22301 BTUs. We then should always add 15% extra to account for room volume, how efficiently insulated we are, outdoor temperature variations, the gardener being in the room for prolonged periods of time - all these things will affect the heat load and therefore, the cooling requirements, plus factoring in some extra capacity will allow the air conditioner some breathing room. Having it completely flat out all the time is a lot to ask of any machinery however well-built or high quality it may be. Now with the extra 15% we have a total of 25646 BTUs of cooling required for this particular room. Once this is calculated, we can really get into it and decide the specific lighting and other equipment we want to use, figure out the dynamics of the room and how we want it to run, and above all, design with efficiency in mind. This is what we should aim for in all aspects of the garden, we want uniformity, cleanliness and efficiency. So what I am going to do is break it all down in stages and in order, whilst accounting for all the variables, the things the gardener needs to know about and learn, preventing problems before they begin, think about the main things to aim for when setting up the room, target temperatures and humidity, CO2 dosing, the airflow dynamics, eliminating potential hot spots and micro climates, sterility in the air, keeping it clean, the layout of the plants, leaving enough space to access everything. Factor in every feature you need in your room and everything you need to be able to control, then plan it accordingly to accommodate.
Hydroponics System
Personally we believe in the philosophy of less is more. We like to give plants plenty of space to grow and we also believe it to be very important to be able to access every single plant for maintenance, to be able to remove branches where necessary, defoliate, top, manipulate and train each plant as required, and we also believe in efficiency. The two best methods we have found are RDWC (recirculating deep water culture) and flood and drain. When planning a large room and the budget is available RDWC is the best choice - it’s clean and water intensive, which means virtually no grow media, which means less waste and far easier harvesting and replanting without needing to get rid of excessive quantities of used media like pebbles, soil or coco and you give your plants massive access to oxygen and nutrient. It’s simple and very efficient. We recommend regular tank changes and to use RO (reverse osmosis water) where possible. The only real down side is that with large RDWC systems, you generally have lower plant numbers which can require a longer vegetative growth time, but you will get very large and heavy yielding plants, and less of them to worry about and pay attention to. It’s also a sure way to keep water temperatures optimal and water conditions free of disease when run with water chillers and sterilising water treatments. The next best option if on a slightly tighter budget with less readily available power to run chillers and/or less water supply available is flood and drain. It usually requires more media to work with but it will be easier to run more plant numbers spaced closer together, resulting in less vegetative growth time and ultimately a potentially higher number of harvests per year. One other method with many benefits worth considering, especially if you’re looking at a very large project or commercial scale application is run to waste in rockwool. It’s clean, it’s very difficult for root disease to spread, your nutrition and pH levels stay precise and unaffected, the waste can be kept minimal, both with the water usage and media disposal, and on a large scale you have less things to think and worry about. There is a reason the majority of commercial facilities worldwide employ this growing method - it’s efficient.
Lighting
Don’t cheap out on lighting people, it’s the most important thing to your plants, the most energy consuming and heat generating items in your room and ultimately can mean the difference between a huge top shelf yield and a pitiful garbage yield not worth even bothering with, so choose wisely! In our personal opinion and experience, the best lights for plants currently available are CDM (ceramic discharge metal-halide) otherwise known as LEC or CMH. They come in several wattages, currently the most popular and efficient being 315 watts. They produce full spectrum light, the closest thing to the sun as possible on the market, the lamps last for about four years before they need replacing, the amount of light they generate which is usable to plants per watt of power used when compared to other conventional lamps is far more efficient. We have found that most people who replace a 1000 watts of HPS light with 945 watts of CDM light manage to easily see a 25% increase in yield per watt of power, a slightly faster flowering period, superior end produce and the plants just look so much happier under these lamps. However, there is a theory, and it is not my theory, nor proven, but it does make a lot of sense to me: indoor plants have been bred indoors for generations under HPS light, could they have genetically adapted to this far red spectrum and become so used to it that even though on paper it’s mostly wasted light and not ideal for plant growth, that they still want some of it and crave it, because it’s what they have been used to for generations. So in my opinion having some supplemental HPS dotted around the room, maybe 15% of your total lighting, is very good practice. But use predominantly CDM fixtures; currently these are the absolute most efficient and reliable lighting to use. Also professional high wattage LEDs now in my opinion do put down enough radiant heat to the plants. Plants don’t want to be cold, and a sealed room full of cool air and lots of light in our experience has not produced even close to the results that CDM can produce. We also recommend saturating with as much light as you can manage and afford; the plants will only thank you for it and ultimately yield more. Another very important consideration if you are setting up a sealed room is to use lighting systems with thermostatic shut off capabilities, in case of cooling system failure, this will save your room, your plants and your equipment from cooking to catastrophically hot temperatures in the event of cooling failure!
Air Conditioning and Dehumidification
So we know how to size our AC and dehumidification according to our cooling requirements, so what else should we consider when choosing our equipment? Firstly I must stress that in any set-up larger than 4000 watts of light, conventional comfort cooling and DIY install air conditioners should be avoided; they simply do not have the power and build quality to handle the massive heat load we are asking of them, and they are usually very inefficient, especially the portable and hosed types. Your AC is a very important aspect of a sealed garden; we recommend ceiling hung commercial split systems, water cooled systems and the absolute best, but extremely expensive option, is a split chilled water cooling system. All of the mentioned options have their benefits and drawbacks. Split systems exchange no air in or out of the sealed space, they work by passing the indoor room air over a coil full of very cold refrigerant, which rapidly removes heat and moisture from the air and transfers the heat into the refrigerant, which then transfers the heat to the outdoor condenser unit where the heat is expelled outside and the refrigerant cools down and heads back to the indoor unit and the process repeats itself continuously over and over. They are energy efficient, they generally have high air flow capacity which allows them to keep the air moving and flowing around the room quick enough to keep the environment even and optimal. The main drawbacks of these systems are the need to have an outdoor unit which is not always ideal for some situations. They only dehumidify while they are cooling and installing them can be challenging; you really need a qualified AC engineer to do the job properly and have a long term reliable cooling system. DIY installation is still possible, but you have one chance to get it right. If you get a refrigerant leak, you will have problems. There are also limitations in how far you can run the refrigerant pipes between the indoor and outdoor units. Water-cooled systems are the next choice, very good if you have access to a lot of cheap or free water. They work in a similar fashion to a split system except rather than transferring the heat from the refrigerant to an outdoor unit, they transfer it to mains water which runs down the drain. They also benefit from the ability to mass dehumidify while they are not cooling, so you will need less budget towards dehumidification as they will do a large portion of that job for no extra cost and less power consumption. The only real drawback with these units are the water they consume - it is considerable. A 10 kilowatt room will use 5 litres of water per minute straight down the drain, so if you pay for water by the unit, it’s not likely to be a viable option. Then we have the best of both worlds - a split chilled water system. These systems are usually used for process cooling, meaning applications like server rooms in airports and telephone exchanges or government buildings, basically places where cooling equipment cannot fail! They are designed for continuous heat load and designed to look after priceless and important, highly valuable heat generating equipment, so they are 100% reliable, quality built machines. They work similarly to a split AC except they use water and glycol antifreeze stored in an internal or external reservoir which is pumped between the indoor air handlers and outdoor water chillers. There are no limitations in the length of runs between the indoors and outdoors, they are up to 50% more energy efficient than split air conditioners, there is no need for an engineer to install them, they can be adjusted to dehumidify more or less aggressively, and they can dehumidify whether they are in cooling mode or not. The only drawback with these machines are the price tag - they are extremely expensive, but if it’s a long term project and reliability, efficiency and performance are at the top of the list, they are by miles the best choice.
Dehumidification is the next thing to consider. Plants transpire 97% of everything they drink. If your plants are drinking a 200 litre tank down to half way every 2 days, literally all of that water is being transpired from the plants back into the room, and if your sealed and have no dehumidification, where’s all that water going to go? Nowhere is the answer! It’s staying in your room causing uncontrollable 100% relative humidity and condensation all over everything! So sizing your dehumidification is just as important as your cooling system. We have tried coming up with formulas and ways of calculating dehumidification requirements in the past and it is almost impossible to get it accurate because at different stages of growth, plants drink more and it depends on how large they are, how much biomass they have, target temperature, literally everything affects the transpiration and room relative humidity. So I am going to just advise what we have found to be more than enough dehumidification for huge plants in heavy flower with masses of foliage - 20 litres per 1000 watts of light does the trick! When choosing dehumidification, consider my advice on the AC. We are putting these dehumidifiers up against it, continuous load, and tons of water moisture to take care of, so don’t expect a domestic unit to make a pin prick in the room; you need commercial grade powerful dehumidification capable of keeping up with what we are throwing at it.
CO2 Augmentation
One of the most important things to your plants is CO2, and in a sealed off grow environment it’s very important to get your CO2 set up correctly. Plants can grow well in atmospheric levels of CO2, which is approximately 400ppm, but they can grow much faster and bigger in a carefully dosed level of CO2. Some claim that 1500 – 1800 ppm of CO2 is optimal. This is not the case. In actual fact, most high energy plants begin to suffer in levels exceeding 1450 ppm; it turns out that when you exceed 1450 ppm the stomata in most species of high energy plants begin to close up and therefore suffer and don’t metabolise as efficiently. The ideal range to maintain is 1250 to 1350ppm of CO2 while the lights are on and then drop it back to atmospheric levels when the lights are off. The two options for CO2 dosing to consider are bottled CO2 with a regulator connected to a CO2 controller which doses precisely the required levels of CO2 when the lights are on and then shuts it off when the lights are off. The other option is a CO2 generator, which burns LPG or NG gas in order to generate CO2. Our number one choice would always be the bottle; it’s cleaner, it creates no additional heat or humidity like a generator does, and generators will give off some carcinogenic gases, minor maybe, but less ideal than clean bottles of CO2. The CO2 controller is very important and should be set up correctly. We don’t want CO2 build-ups at night, so we recommend a controller which can have a pre shut off cycle, meaning it will stop dosing CO2 15 or 20 minutes prior to the light shutting off, which will result in the plants consuming all of the CO2 available in the room and the levels will be dropped right down before the night cycle starts, because while plants are not photosynthesising they give off CO2. This build-up of CO2 in the room whilst the lights are off is not ideal and should be avoided.
Humidification
A very important consideration, especially when the plants are young and are not transpiring very much moisture into the room. If you have a lot of light running and your AC is working hard, it will strip the moisture from the room rapidly and this will result in very low relative humidity and a less efficient cooling capacity. The AC needs moisture to bite into in order to run efficiently, as do your plants, so humidification is very important too. We recommend about 1 – 2 litres of humidification per hour per 1000 watts of light, and we recommend commercial grade humidification, positioned away from direct plant contact. Ideally it needs to mix into the air rather than just soaking the plants immediately next to it. Humidifiers will also come in very handy if your trying to stick to the VPD chart, which essentially means keeping higher temperatures and relative humidity levels to accompany the extra co2 which allows your plants to metabolise and grow at far faster rates than they usually can, VPD or vapour pressure deficit is the relationship between moisture in the air and moisture exiting the stomata of the leaves through transpiration, it’s a fundamental hidden force on your plants and the secret key to taking full advantage of co2 and environmental control in a sealed grow room, if your unfamiliar with VPD I suggest you look it up! VPD control is now possible with the GHC Smart VPD Digital Temp / Humidity Controller. Ultimately if there is no moisture in the air, your cooling efficiency suffers and much worse, your plants will over transpire and suffer very quickly in low humidity conditions, and at the end of the day, the point of a perfect room is for it to be as close to perfect as possible, so everything must be taken care of - humidification, cooling, dehumidification, CO2 etc. are all as important as each other. If one falls out of sync the rest will fall apart as well. Humidification controllers are very important too; we highly recommend setting your humidification and dehumidification in a day/night controlled fashion, meaning we can dial in different levels in the day to the night. I’ll talk more about this later.
Air flow and Care
We have covered room build briefly! Lighting, cooling, humidity control and CO2 and the recommended equipment required to achieve optimal reliable environmental parameters. Now we will touch upon all the other peripherals which are essential to the room’s dynamics. Air flow and care are extremely important to keep the temperatures, humidity and CO2 levels even and optimal throughout the room. It’s very important to keep the air moving and flowing. Equipment needs to be strategically placed; we want to avoid any build-ups of CO2 in corners of the room due to loss of air movement, likewise, we also want air flowing freely from AC and dehumidifiers to ensure the environment is even everywhere in the grow space. You should be able to feel a gentle breeze wherever you stand in the room, and we want air being dragged from the floor upwards and air across the ceiling moving quickly too, so all of the heat and humidity is always mixing through and being cooled and controlled everywhere. We recommend going overboard with wall fans and floor fans, and don’t use cheap ones if you can avoid it, as mentioned earlier. Make sure air handlers for cooling systems are heavy duty ones with big airflow capacity which will churn t

